Tuesday 28 May 2013

Dare to Dream

I really liked the sketch over at CAS(E) this Sketch this week


Dare to Dream

I was playing around with some Gelatos.  I drew straight onto the stamp and spritzed with water and stamped onto the card that I had masked on an angle.    I used a technique I learnt on His & Hers Online class to make my line.  I masked a thin space and used Memento Peanut Brittle ink along it.   The butterflies were punched from watercolour paper that I had used Gelatos on and overstamped with an Inkadinkado flourish using Golden Glitz Delicata ink.   The sentiment is from Couture Creations.    I wanted to added some sequins but as soon as I saw the stars in my jar of mixed sequins I knew I wanted to use them.    

I've also added this to the CAS challenge over at A blog named Hero

Today was one of the coldest we've had in Auckland for quite some time.   Several big storm fronts came through.
this was taken out the window from my office at around 9.00am this morning.  You couldn't see the city ~ it moved really fast and within minutes, thunder, lightening and heavy rain.    Parts of the South Island had the first heavy snow fall of the year.  


This photo was taken by a friend in Dunedin.  The city doesn't often get snow, but today was very snowy.

Thanks for stopping by. 


Monday 27 May 2013

"Sixteen Candles" @ Red Carpet Studio


This week's inspiration film is "Sixteen Candles" and we want you to create a Birthday card... Easy yes!!!  Our sponsor is Paper Pretties


and we got to choose an image to make our cards.  They have the cutest digi stamps.


Isn't this so cute.  It's the perfect card for a 3 year old!  And it's currently on it's way to a certain sweet little one turning 3 in a little while!

The PP is some freebie stuff I had sitting on the desk.  I cut out some white card with the Spellbinders die and then sponged some pink distress ink while the die was still in place.  I printed and coloured the image and fussy cut.  Added some Glossy Accents to the balloon and the nose.  The sentiment  is from a Hero Arts set. 

This card has been added to the Paper Craft Idol Gallery 2013.
Entered also into the challenge over at Crafting When  We Can ~ using punches/Die cuts

So lets see your birthday cards over at Red Carpet Studio.  


Sunday 26 May 2013

Mixed Media Canvas....

I have finally finished my Mixed Media Canvas.... it's taken awhile, but with some help from my Facebook friends I have it done.  I got so far and didn't  feel it was quite finished.  That's where Facebook came in.  I posted in my main page and in a forum I belong to, asking for some ideas.

So without further ado................

Mixed Media Canvas

I started with my canvas and added some Soft Gel medium and pieces of torn pages from an old phone book. I then added some paints, distress stains, ink, used some stencils and some stamps to create the background.  I stamped the dress form (Stampendous stamp) onto some tissue and coloured with pearlescent paints.  I then used the medium to add it to the background.  I stamped the sentiment  in Archival black ink.  The sentiment is from Couture Creations.

This was the point I got to when I asked for advice.  Several people suggested some texture... so decided to add the flower to the dress  form.  I got some organza in burgundy and cream.  I cut the pointy flower from Tim Holtz Tattered  Florals die, the middle sized flower with some netting and then two small flowers in the burgundy organza and cut a larger circle of the same organza.  I held the centres with a small paintbrush while heating the organza which causes it to shrink and shrivel.  I coloured a white brad with black copic and then added clear embossing powder.   The leaves were die cut with a MFT Dienamic die.

I have to say I was pleased with the result.  It was worth the time taken.  I am entering this into the 350 Cards & Gift week ~ Gift Challenge at Moxie Fab World

My Red Carpet Studio post will be here to tomorrow...and if you are interested, I'll be posting at Little Blue Button Stamps tomorrow (Sunday USA time) - would love to have you visit.

Hope your weekend is going well.

Saturday 25 May 2013

Thank you at Mo's Challenge Blog

A little while ago Mo Manning had an adorable little image for free... you had to be quick (which I was!!!) but is now available in her shop (Mo's Digital Pencil)  I had it printed and coloured and was just waiting to make it up into a card.  The image is called "Thanks" and that's the challenge at Mo's challenge blog this week.

so I pulled this one together quite quickly

thank you

I stamped the banner from a Kaisercraft set across the corner of the panel and then onto some MME papers from the Happy Day pack.  I cut and pieced the banner and added my sentiment which is from a Hero Arts set.  Mounted the panel onto some dark blue card and then onto a dark kraft card base.  Quick and simple but looks so cute I think.

It's a dismal day here after a nice one yesterday.  Two anti-flamme pain killers for my knee and I managed to clean all my lounge room and dinning/kitchen window sills ~ now just to vacuum and the house work done for the day.... the bedroom sills can wait till tomorrow as I want to "play" not clean!!!

Have an awesome weekend all

Thursday 23 May 2013

Teen Birthday......

that and kids birthday cards is the theme over at Paper Crafts Gallery idol  
I made this card for my niece's 17th birthday next week so have entered it as one of my three entries

Teen Birthday

The image is a digital stamp from Mo Manning called Jammin' Janice and is available at Mo's Digital Pencil.  I printed out image and used Copics to colour.  I used a Spellbinders die to cut her out.  The PP was sitting on my desk, so not sure where it came from.  The sentiment is from a Penny Black set.  I finished with some star sequins that I added a dot of stickles to the centre.  A little lacy bow and the card is now winging it's way to Australia in time for Sasha's birthday.

Had a lovely dinner out last night.... it's nice to spend time with friends enjoying a good meal out.  


Wednesday 22 May 2013

The Music is all around us!


all you have to is Listen.... isn't this a great sentiment.  I found it on the 'net and used it for a card I made for the recent 90 minute scramble on this card

Music


While I was participating in the scramble I made a background but due to the fact I used Green ink and that was not in the brief....and as I was not happy with this card... I did some de-constructing and some re-constructing.

Music is all around

As you can see, I took the die cut sentiment piece off, removed the stars, took the background music off and replaced it with the background I made.  I added the sentiment die and then stamped the Penny Black birds onto watercolour paper and coloured with Inktense pencils.  I did the colouring while I was Skyping with Isha in Switzerland.  I am much happier with the card now.

We've off to dinner with friends tonight.  One of the local Indian restaurants is having a good special on so we are making  the most of it. 

I'll leave you with a photo I took this week that show that Autumn is making itself felt here at last


Autumn leaves


Sunday 19 May 2013

Deborah sets a Challenge................

Yes, did Deborah set a challenge or what!!!  Today was a 90 minute scramble over on the Hero Arts Flickr group.   So the hostess was Deborah and she really came up with a challenge and a half....


1. Music (stamps, song lyrics, music-themed paper, etc.)
2. Heavenly bodies (stars, moon, sun, etc.)
3. NO green ink or cardstock (okay in a pattern paper, though)
4. At least one ink that isn't black or brown (you can use black or brown, but we need to see another color of ink in there somewhere)

So there I was at 8.00am on a Sunday morning and do you think I could find my Hero Arts Musical background stamp.... I must have spent almost 10 minutes looking.... then I thought...last time I used it was at Christmas.... was it with my Christmas stamps... yes there it was.... and then by the 18 minute mark, I still didn't have an idea. 

Then inspiration...

You're a Star


I used Dried Marigold distress ink to stamp the Musical background and then distressed the edges.   I had major issues with the sentiment stripe.  I must have stamped it three times.  Twice I smudged the ink.  The stars and sentiment are from Teddy Bo & Co.  I tied some yellow twine around the panel.   It was all mounted on a cream card base.

I thought I'd do another card and started off stamping the music background in black and used some distress inks to colour.... but wait.... is that green ink I spy.... darn it... that piece will have to be used somewhere else....  so with about 20 minutes to go, I had another go.

Music


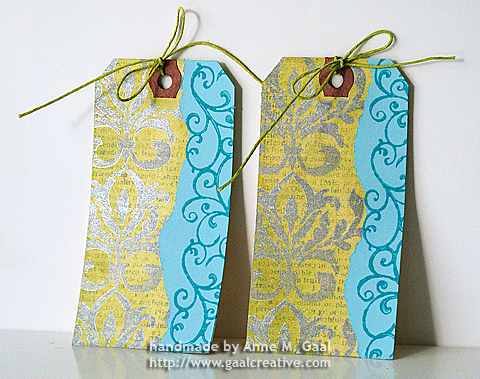
I used a blue Distress ink to stamp the musical background and used some soft colour inks to cover the background.  I used the computer to make the sentiment and cut it out with an oval Spellbinder die and used the Floral Ovals to cut a mat in the blue.   I finished with some silver stars.   Just got it finished with about 2 mins to spare.  Now I'm not so happy with this one, and feel it might get reconstructed at some time.

So thank you Deborah for providing a great challenge on this scramble... a great start to my day.

Saturday 18 May 2013

Don't you just hate it when............

you carefully add all your elements onto your card base and ....... find you've added them upside down....

can you see what I mean?  Frustrating.

But never fare I managed to selvage it...

IMG_6975

I simply trimmed the black card and layered it onto a white base.

My stamped image is from Tim Holtz and is stamped with Black Archival ink onto some grey core'dation card and layered with black and more grey.  The gears are Peelcraft stickers added to black card which I then layered onto the grey card.

and I added some Peelcraft edge stickers to the inside


I'm finishing today with a photo I took of a newly hatched Monarch butterfly

Newly hatched butterfly

this butterfly had made it's cocoon on the cactus plant.  It was one of three that hatched today.  The sun was shinning and it warmed the wings.

Wishing you a happy weekend.


Thursday 16 May 2013

Die Cut Diva Guest Designer ~ Anne Gaal


This month's amazing guest designer over at Die Cut Diva challenge blog is none other than Anne Gaal... and today she paid me a lovely compliment by highlighting me on her blog...( see here)  So I'm here to pay the compliment back.

Anne is a true artist.  She makes cards, ATC's, paints and just lately she has been making some amazing pieces of jewellery.  You can see the Die Cut Divas post about Anne and her jewellery here

Today I want to share with you some of Anne's beautiful work ( all shown with her permission)

First up a pair of tags Anne did in 2010.  Just incredible.

Paint Dabber tags with Baroque Ornaments

Next a mixed media piece from September 2013

Mixed Media Green Owl

and a beautiful card
Queen for a Day Card 

This card  was done very recently and if you click on it, it will take you to a video Anne did on how it was made. 

and finally a piece of jewellery

http://img0.etsystatic.com/009/1/5567639/il_170x135.459207792_d0dq.jpg

Anne is very generous in sharing her art with great tutorials, discussions and videos.

Anne and I bonded several years ago when we both were going through some similar health issues and I am happy to call her a friend.  One day, maybe, we might even get to meet in real life!  Who knows!

So please go and visit and have a look around her amazing blog ~ Gaal Creative  and have look around her Etsy shoppe

And don't forget to visit Die Cut Divas for a look at more of Anne's jewellery today.


Tuesday 14 May 2013

Postcard Collage

I'm sharing another card I made for Scottie Crafts.    I used the Farm House Fair Skies paper once again.  This time it was the reverse of Drifter PP and the Whirlwind PP.


I used the reverse of the Drifter PP to cover the card base and the Whirlwind PP was stamped with a variety of Hero Arts stamps.  The main one being Big Postcard  as well as stamps from Carte Postale set and the Garden Bouquet for the flowers.  I used Wild Honey distress ink for the flower  and for the stamp on the postcard.  I edged the postcard with Walnut Stain.  I added some sheer green dotty ribbon to the postcard and added it with pop dots to the card base.

Once again a big thank you to Scottie Crafts for providing the papers that I used.

Sunday 12 May 2013

"Baby Mama" @Red Carpet Studio


This week's inspiration at Red Carpet Studio is the movie "Baby Mama" and your challenge is to make a Baby Card.  Our sponsor this week is Eureka Stamps


Our DT got to chose a digital stamp to use and I chose this one
digi40204 Baby Animals

and here is my card


I printed out the digi and coloured it with Copics.  I made a bit of a mess with my sentiment not going on straight, so saved by stamping it on a scrap of the PP and punching it out with a Stampin' Up oval.  The sentiment is from Stampin' Up as well.  I borrowed the stamp from my friend, Sandie, when I spend the day stamping at her place.  Finished with some gems and a ribbon bow.

And as it Mother's Day here in NZ, I wish you all a very Happy Mother's Day.  My son came over for dinner which was lovely.  The weather was beautiful and sunny so it was a good day


Friday 10 May 2013

His and Her Sympathy

I took the His and Hers on line class last week, but didn't actually make many cards... but learnt lots of things.  I did mange some cards over the weekend thankfully as this week not a single card made!  I've been suffering sore limbs.  My right shoulder has been feeling stiff for some time and I finally have been having some physiotherapy and then Tuesday I woke to a stiff right knee... by Thursday I couldn't hardly walk .... luckily I had a physio session so my therapist concentrated on the knee rather than the shoulder.  Still it means I don't feel like sitting and creating.

So on to the His and Her cards I made in the weekend.  First up the Hers card

His and Her Sympathy

I used the design and some of the techniques I learnt in the class.  I stamped the Etched Flower from Hero Arts in Olympia Green Versafine ink and used my Inktense pencils to colour and watercolour the flowers.  I went over the edge of the flower with an HB pencil.  Before mounting the panel to my card base, I added a strip of PP from Crate Paper down the edge.   The sentiment is from Hero Arts as well.

My His card 

His and Hers Sympathy ~ Masculine Version

For this one, I used the same PP down the side and a similar design.  I stamped the Silhouette Grass in Memento Grey Flannel ink and used Inktense pencils to colour the sheaves.  Again used a Hero Arts sentiment.

I did not know that I would want to use one of these cards this week, but a friend at work, lost her mother on Monday.  Several of my work mates wanted sympathy cards as well, so they came in handy. 

Hoping that I get some time to play, and the inclination to do so, this weekend.  My son is coming round to have dinner with us on Sunday which will be nice.  He is working not too far from where we live and will call in, shower and stay for dinner.  

To all the Mothers out there..... Happy Mother's Day for Sunday.  


Tuesday 7 May 2013

Playing with Patterned Paper.

Today I want to share a couple more cards I made with the Farm House Fair Skies papers from Scottie Crafts.

First up


 I used both sides of Weightless PP.  The flags were cut from the front and glued to the panel made from the reverse side of the PP.  I took some bakers twine and glued it along the top of the flags.  I made some little knots and glued them down.  I edged the panel with distress ink and added some eyelets in the corners.  I used a Hero Arts sentiment set (It's Your Day) to stamp my sentiments.  The panel was then added to a royal blue card base.

My second card


For this one I used Drifter and Celestial papers to cut the banners.   I used Spellbinders Eyelet Dies to cut a circle which I cut in half and layered on top of the banners.  Tied some brown scrappers twine around the top of the card and threaded it through the button.  I made this by glueing some of Drifter PP onto the back of a clear button.  Once it dried, I trimmed around it and filed it to get smooth.   I finished it off with gems around the eyelet circle and on the base card. The sentiment is from Hero Arts and is stamped in Delicata Golden Glitz ink.

I have to say I've had great fun using these Patterned Papers.  A few more cards to share that I've made.  These papers are 12x12 sheets but they also come in a 6x6 pad where the elements are all a bit smaller.

Thanks to Scottie Crafts for providing me these papers to work with


Hope this gives you some inspiration.  And do hop over and see the goodies at Scotties.


Monday 6 May 2013

Picture Perfect


Today is my first post over at Little Blue Button blog.   I got to use one of the new release digi stamps today
This is Miss Lilly Reporter and here is my card


This is the sweetest little image and so easy to colour.  I used Copic markers and a touch of stickles.


I fussy cut Lilly and then made the base to layer her onto.  I chose to use some PP from My Mind's Eye- Miss Caroline all dolled up,  and trimmed it to include the flowers and doilies into the corner.  I love the wood grain look to this PP.   I used a sentiment from a Lawn Fawn stamp set and finished with a few tiny hearts.  These were the scraps from a die cut I did with a Simon Says Stamp die.


I hope this has given you some inspiration.  Do hop over to the shop and pick up your images and have fun.